Billing and invoicing
This guide explains how to set up billing profiles and invoicing in Zooza. Billing profiles store your company details (name, address, IBAN) that appear on invoices and in payment instructions sent to clients. Invoices can be generated automatically when a payment is received, or manually per booking.
Note: If you use external invoicing software (Xero, Abra Flexi, Smartbill, Szamlazz), you may not need Zooza's built-in invoicing. See the Related section for integration guides.
Where to find billing settings
Go to Settings → Billing.
The Billing page has three sections:
- Invoice settings — automatic invoice generation toggle.
- Default billing profile — your primary company and bank details.
- Other billing profiles — additional profiles for multi-entity businesses.
Automatic invoice generation
The first section controls whether Zooza generates invoices automatically.
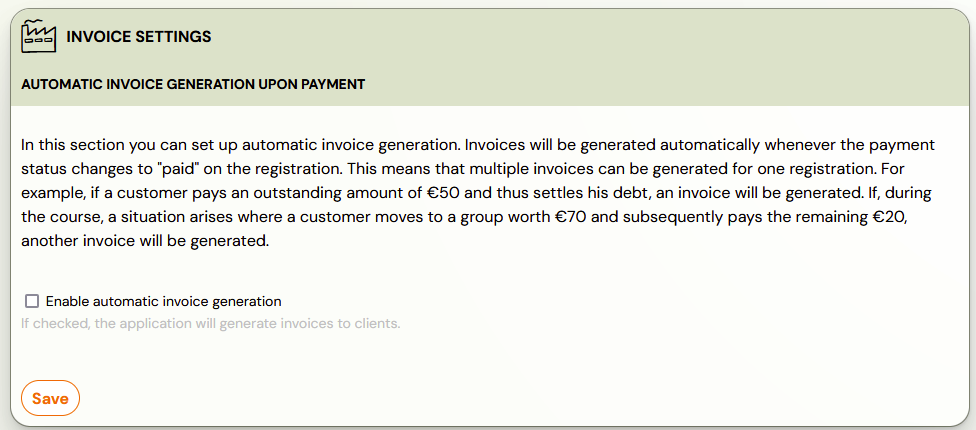
When Enable automatic invoice generation is checked, Zooza generates invoices automatically based on payment events. Two independent triggers are available:
| Trigger | When it fires | Typical use |
|---|---|---|
| Debt cleared | When a booking reaches Paid or Final payment paid status | Standard — one invoice per settled payment |
| Down payment paid | When a booking reaches Down payment paid status | Useful when you want a separate invoice for the deposit upfront |
Both triggers are on by default when you enable automatic invoicing. You can turn each off independently if your accounting workflow doesn't need that event.
- A single booking can produce multiple invoices (e.g., one per instalment, or deposit + final).
- If a client pays 50 EUR now and 30 EUR later, each trigger fires separately.
When automatic invoicing is off, no invoices are generated automatically. You can still generate invoices manually per booking (see Manual invoice generation below).
Tip: If you are just getting started with Zooza, you can leave automatic invoicing off, accept bookings and payments, and enable it later once your accounting settings are ready. You can also generate invoices retrospectively.
Default billing profile
The default billing profile is used on all programmes unless you assign a different profile. It contains your company and bank details that appear on invoices and in payment communications.

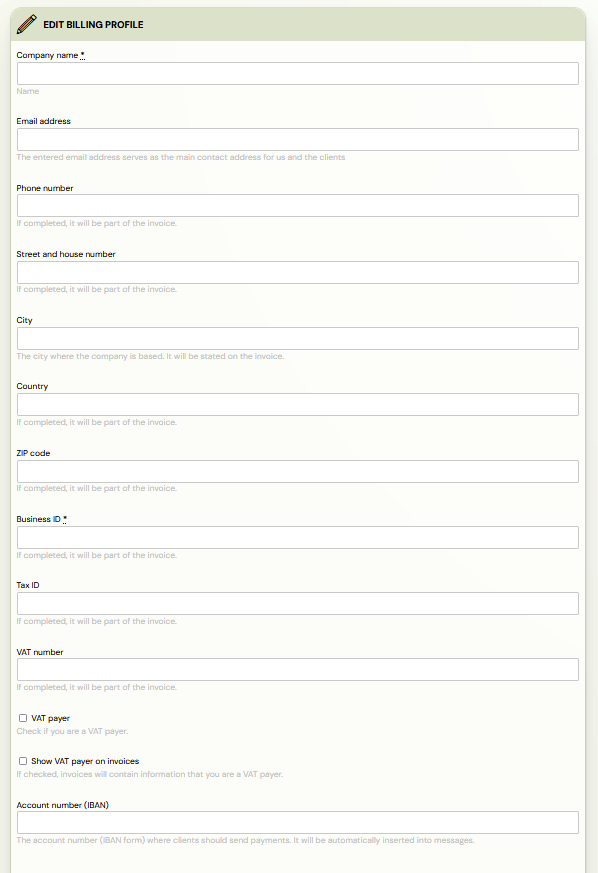
Click the company name (or Not Set) to open the profile editor.
Billing profile fields
| Field | Description |
|---|---|
Company name | Your company or trading name. Appears on invoices. Required. |
Email address | Main contact email for your company and clients. |
Phone number | Contact phone number (appears on invoice if filled). |
Street and house number | Company address line. |
City | City. |
Country | Country. |
ZIP code | Postal code. |
Business ID | Company registration number. Required. |
Tax ID | Tax identification number. |
VAT number | VAT registration number (if applicable). |
VAT payer | Check if your company is a VAT payer. |
Show VAT payer on invoices | If checked, invoices display your VAT payer status. |
Account number (IBAN) | Bank account in IBAN format. Automatically inserted into payment messages sent to clients. |
Account holder name | The exact name registered with your bank for this IBAN. |
Account holder name and IBAN
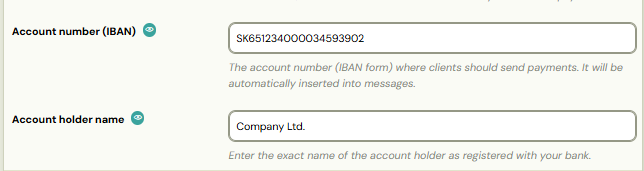
The Account holder name must match your bank account exactly. This field is important for two reasons:
- QR code payments — When clients scan a QR code from a payment email, their banking app verifies the account holder name. A mismatch can cause the payment to fail.
- Instant Payments Regulation — EU regulations require that the account holder name matches the IBAN. If these do not match, some banks will reject the transfer.
Tip: You can include your IBAN in payment emails using the dynamic tag for bank account number. This pulls the value directly from the billing profile assigned to the programme.
GoCardless bank pairing
If you use GoCardless for direct debit, you can pair your bank account with GoCardless directly from the billing profile. This enables Zooza to automatically match incoming bank transfers to the correct bookings.
If the bank account is not paired, you will see a notice:
"The bank account on this profile is not paired via GoCardless, which means that unless you use another type of matching, Zooza will not be able to automatically match payments made by your clients' bank transfers."
For GoCardless setup details, see GoCardless Integration FAQ.
Additional billing profiles
If you operate multiple companies or brands, you can create additional billing profiles. Each profile has its own company details, IBAN, and invoice numbering.

Click Add to create a new profile. The form is the same as the default profile.
Assigning a billing profile to a programme
Each programme can use a specific billing profile for invoicing. To assign one:
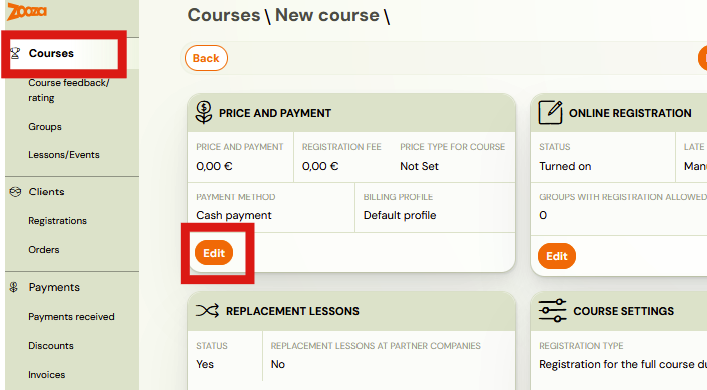
- Open the programme and go to Settings.
- Open the Price and Payment tile.
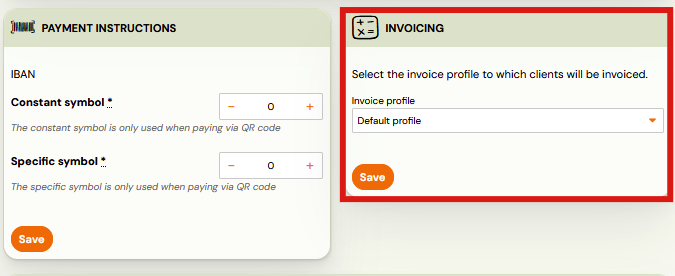
- In the Invoicing section, select the desired Invoice profile from the dropdown.
- Click Save.
If no profile is selected, the default billing profile is used.
Invoice overview
All generated invoices are listed under Payments → Invoices in the left menu.
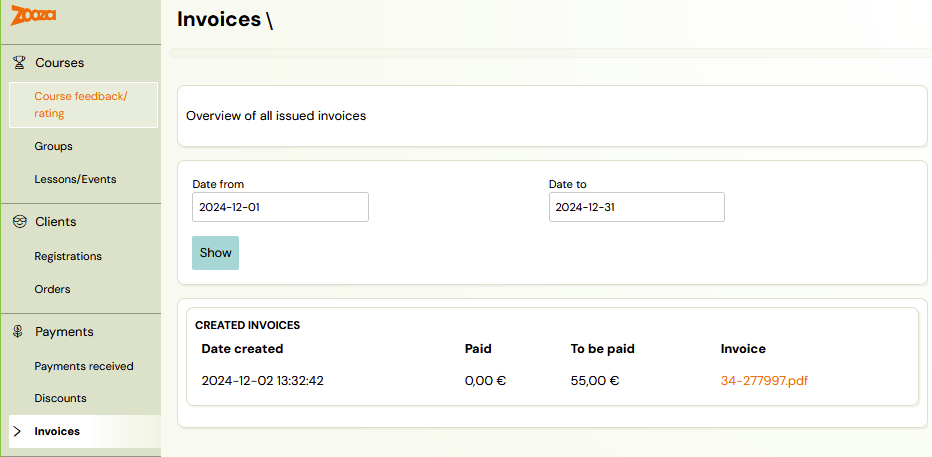
You can filter invoices by date range and see the creation date, paid amount, outstanding amount, and a link to download the PDF. For full details on the invoices screen, see Invoices.
Manual invoice generation
You can generate an invoice manually from any booking, regardless of whether automatic invoicing is enabled.
- Open the booking detail.
- Find the Payments tile — it shows the current payment status and balance.
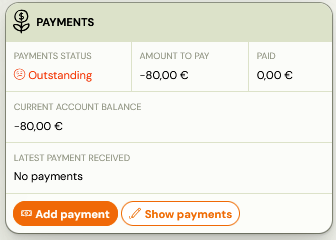
- Click Show payments to expand the payment details.
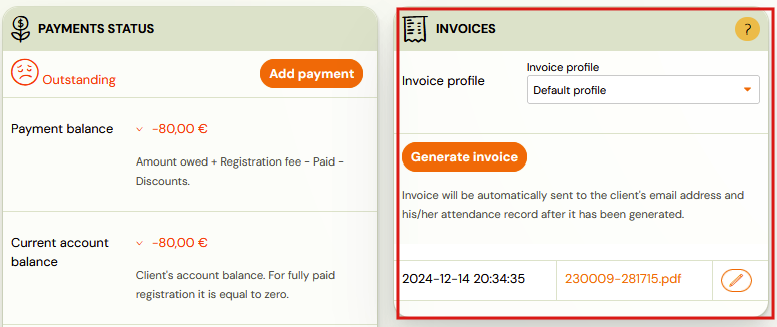
- In the Invoices section on the right, select the Invoice profile to use.
- Click Generate invoice.
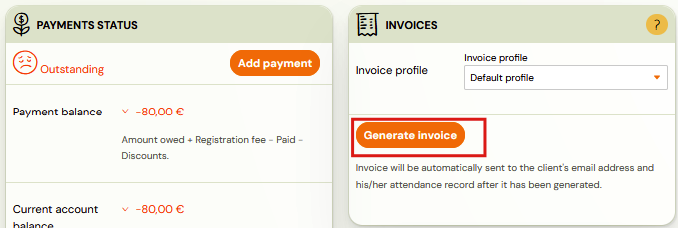
The invoice is generated immediately and sent to the client's email address. The client's attendance record is included in the invoice.
After generation, the invoice appears below the button with its timestamp, invoice number, and a link to the PDF.
Editing a generated invoice
After an invoice is generated, you can edit it by clicking the pencil icon next to the invoice PDF link. The edit dialog lets you change:
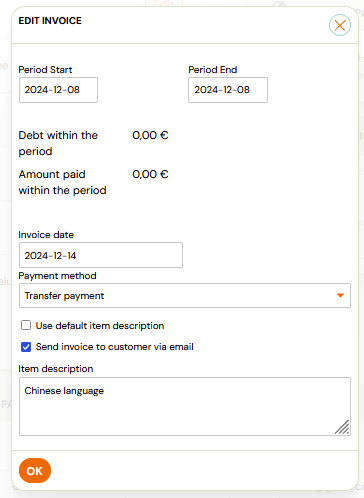
- Period Start / Period End — the billing period covered by the invoice.
- Invoice date — the date printed on the invoice.
- Payment method — how the client paid (e.g., Transfer payment, Cash, Card).
- Use default item description — uncheck to write a custom description.
- Send invoice to client via email — check to re-send the updated invoice.
- Item description — custom text for the invoice line item (e.g., the programme name or a custom note).
Note: Editing an invoice does not change the underlying payment. It only changes what appears on the invoice document.
Invoice numbering and item descriptions
Invoice numbers are generated sequentially per billing profile. The format and starting number are configured in the billing profile settings.
Custom invoice number template
For invoice engines that support Zooza-generated numbers (Faktury Online, Fakturoid, Zooza Invoice, Xero), you can define a template that controls the exact format of the invoice number — for example aligning it with the client's variable symbol or making it human-readable.
Available tags:
| Tag | Resolves to | Example |
|---|---|---|
{VS} | Variable symbol (booking reference number) | 12345 |
{YYYY} | 4-digit year | 2026 |
{YY} | 2-digit year | 26 |
{MM} | 2-digit month, zero-padded | 05 |
{DD} | 2-digit day, zero-padded | 09 |
{N} | Sequential invoice number per profile, zero-padded to 4 digits | 0042 |
Example templates:
| Template | Result |
|---|---|
{VS}-{DD}-{MM}-{YYYY} | 12345-09-05-2026 |
ZOOZA-{VS} | ZOOZA-12345 |
INV-{YYYY}-{VS} | INV-2026-12345 |
{VS}-{N} | 12345-0042 |
Set the template in the Invoice profile settings under the invoice number / series field. If you leave the field empty, Zooza uses sequential numbering.
Note: This template feature applies only to the four engines listed above. For Számlázz.hu, Smart_Bill, Oblio, and ABRA Flexi, the field is interpreted as a literal prefix or series identifier, not a template — those engines manage number formatting on their own side.
For the invoice item description, you can use dynamic tags to automatically insert programme-specific information (e.g., programme name, billing period). This is useful when generating invoices across many programmes — each invoice will contain the correct programme details without manual editing.
Zooza Invoice — templates and branding
Applies to: Invoice Profiles using the Zooza Invoice engine only.
When your Invoice Profile uses Zooza Invoice, you can choose a visual template and set brand colours and fonts. The invoice preview shows your actual company logo, name, address, bank details, and QR code alongside mock buyer data — so you see exactly what clients will receive.
Choosing a template
Three templates are available:
| Template | Description |
|---|---|
| Classic | Traditional invoice with blue accents and clear structure. |
| Minimal | Clean white design with thin rules and subtle typography. |
| Modern | Bold coloured header, card layout, alternating row colours. |
To select a template:
- Go to Settings → Billing and open the Invoice Profile.
- In the Invoice Engine section, find Template.
- Choose a template from the list.
- Click Preview to see a rendered preview with your company branding.
- Click Save.
Setting brand colour and font
Below the template selector:
| Setting | Options |
|---|---|
| Primary colour | Any hex colour (e.g. #e63946). Applied to headers, accents, and highlights. |
| Font | Default (Inter / Segoe UI), Serif (Georgia / Times), Mono (JetBrains Mono / Courier). |
Changes are reflected immediately in the preview.
Preview
Click Preview at any point to generate a full-page preview. The preview uses:
- Your real company name, address, tax IDs, logo, IBAN, and QR code.
- Translated mock buyer data and sample line items (no real client data is used).
This means the preview is an accurate representation of what your invoices will look like — including your logo and bank details.
Per-invoice template override
If you need a specific invoice to use a different template, set template_id in the invoice's engine_data at generation time. The company default applies to all invoices unless overridden.
Multi-line invoices
By default, Zooza generates a single-line invoice — one line item with the total amount.
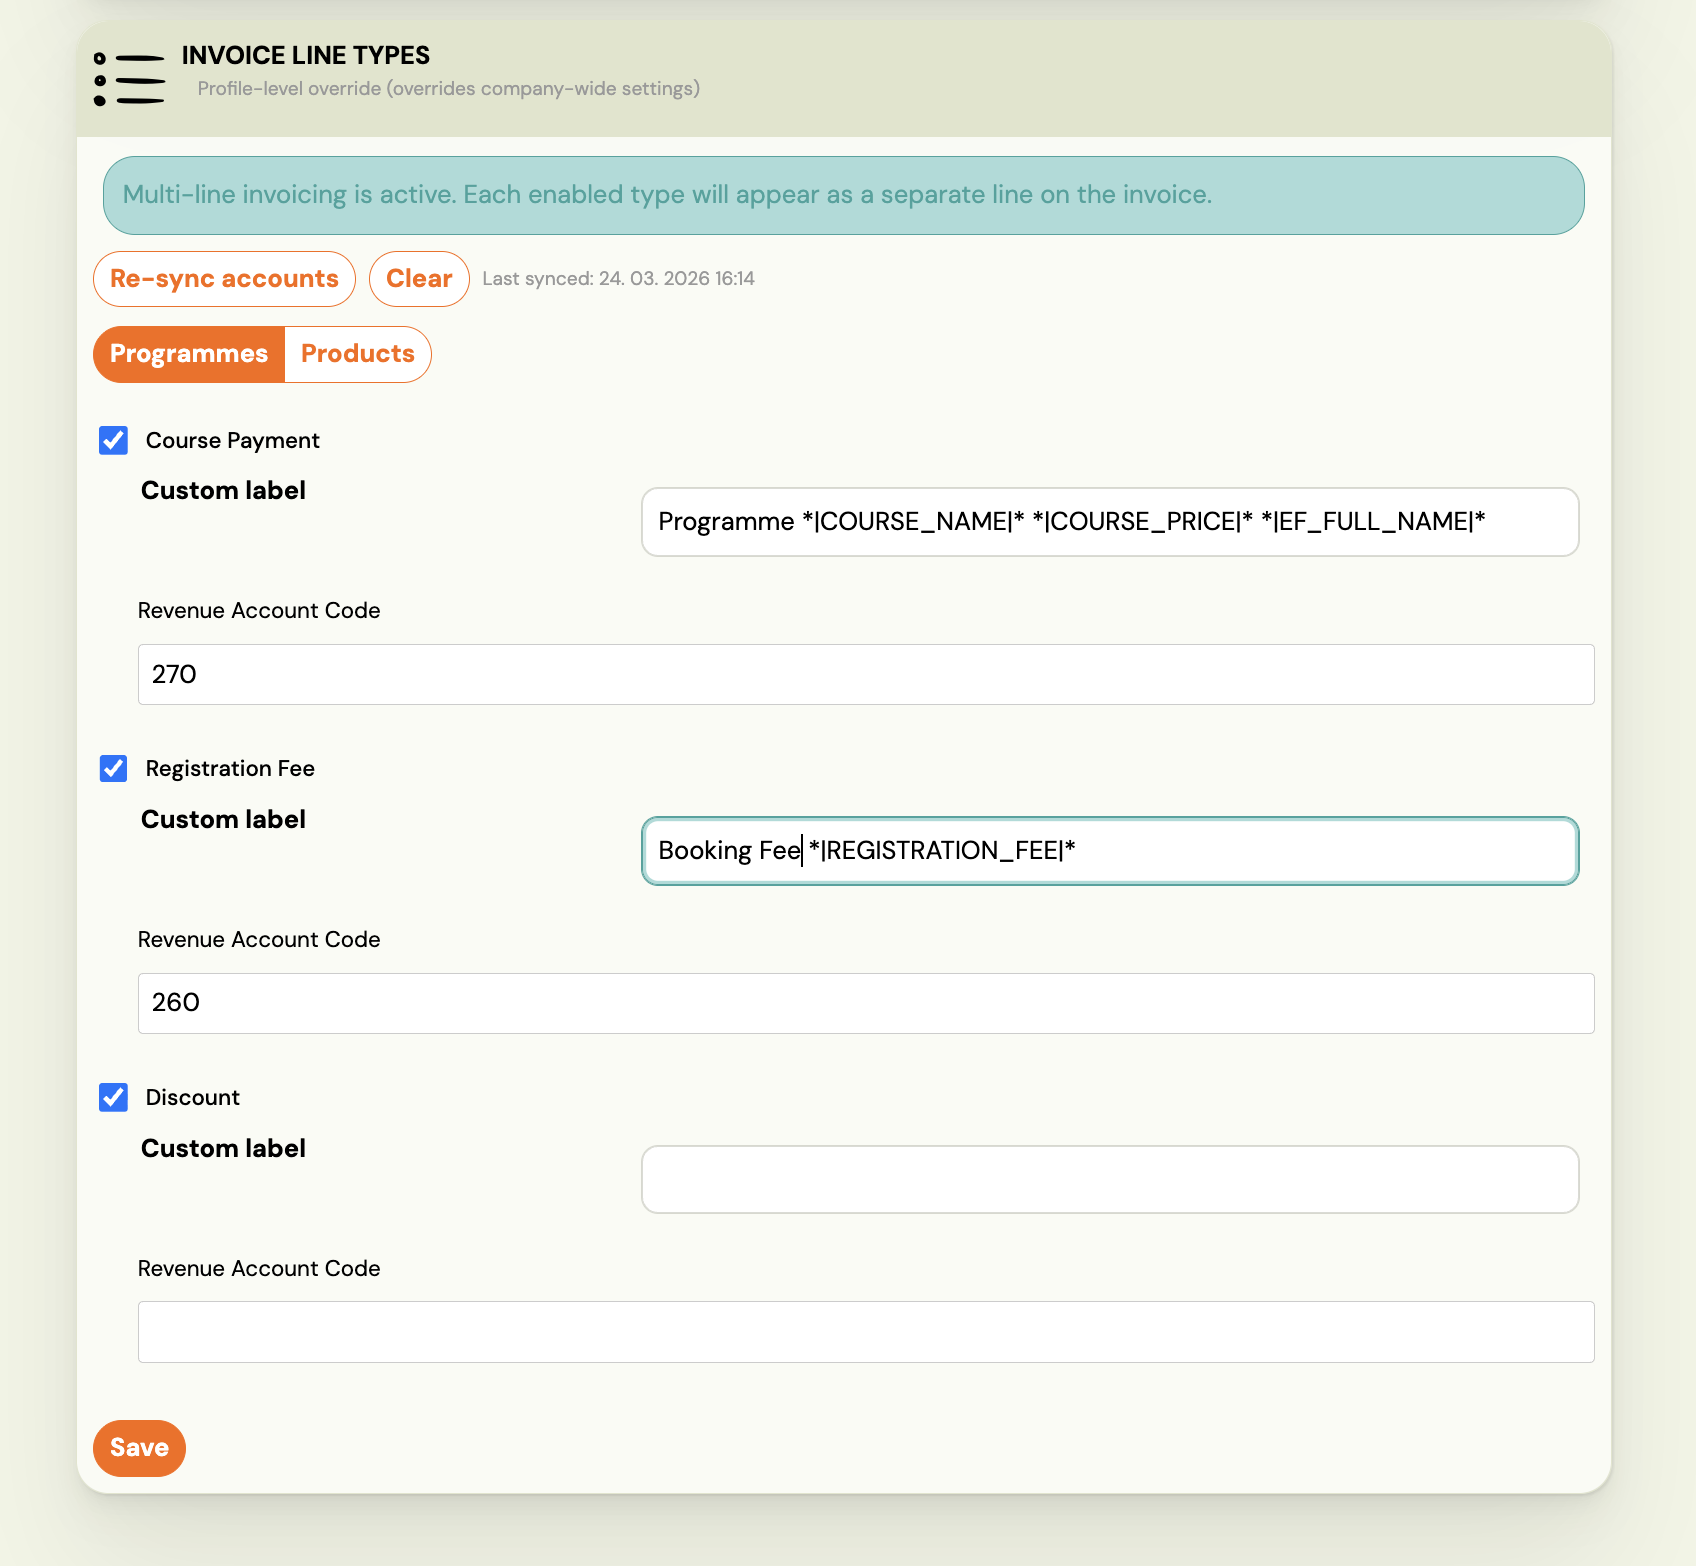
Multi-line invoices break the amount into separate lines per transaction type — for example: Course Payment, Registration Fee, Discount. Each line can have its own label and, if you use Xero or ABRA Flexi, its own account code.
Where to configure
Open an Invoice Profile (/#settings/invoice_profiles) and scroll to the Invoice Line Types section at the bottom of the profile.
Note: Settings here override the company-wide defaults for this profile only.

How to activate multi-line
Multi-line activates automatically as soon as at least one transaction type is enabled. There is no separate on/off toggle.
- Open the Invoice Profile at
/#settings/invoice_profiles. - Scroll to Invoice Line Types.
- Select the tab — Programmes (course registrations) or Products (product orders).
- Check the transaction types you want to show as separate lines (e.g. Course Payment, Registration Fee, Discount).
- Optionally set a Custom label for each line. You can use dynamic tags — for example
*|COURSE_NAME|*inserts the programme name automatically. - Click Save.
The status banner confirms when multi-line is active: "Multi-line invoicing is active. Each enabled type will appear as a separate line on the invoice."
To return to single-line, uncheck all transaction types and save.
Account codes (Xero and ABRA Flexi)
If your Invoice Profile uses Xero or ABRA Flexi, each transaction type also has an account code field:
- Xero —
Revenue Account Code(e.g.260 - Class Sales). Use Sync accounts to pull the latest accounts from Xero. - ABRA Flexi —
Středisko(cost centre) andČinnost(activity code).
Account codes are optional. If left empty, the profile-level default account is used.
Transaction types
| Type | Description |
|---|---|
| Course Payment | The main payment amount for a course registration |
| Registration Fee | One-time fee charged at registration |
| Discount | Any discount applied to the booking |
| Credit | Credit applied from a previous overpayment |
Unchecked types are merged into the main line (or into the nearest checked parent if they are a correction type).
Correction types and merging
Each payment type has a corresponding correction type (e.g. Course Payment Correction). If a correction type is not in your mapping, its amount is automatically merged into the parent line — the result appears as a single net amount. If you add the correction type to the mapping, it appears as its own negative line.
How clients access their invoices
Clients can find their invoices in two places:
- Client Profile → Payments — invoices generated for their bookings appear here as downloadable PDF links. The client does not need to contact you — they can download invoices themselves at any time.
- Email — when an invoice is generated (automatically or manually), Zooza sends it to the client's email address. The invoice is attached as a PDF to the email.
Why a client says they cannot see their invoice
| Situation | Cause | Fix |
|---|---|---|
| Invoice not in Client Profile | Invoice was not yet generated | Generate it manually from the booking detail or enable automatic generation |
| Client received email but no attachment | Invoice email may have been the payment notification, not the invoice email | Check whether automatic invoice generation is enabled and which trigger fired |
| Invoice is in the profile but client cannot find it | Client is looking in the wrong section | Tell them: Client Profile → open the booking → Payments → Invoices |
| Invoice shows in admin but client cannot see it | Invoice may be assigned to a different email address | Check the email address on the booking vs. the email the client uses to log in |
Sending an invoice manually to a client
To re-send or send an invoice that was not delivered automatically:
- Open the booking detail.
- In the Payments tile, click Show payments.
- Find the invoice in the Invoices section.
- Click the pencil icon to edit it.
- Check Send invoice to client via email and save.
The invoice is emailed to the client immediately.
Related
- Invoicing overview — how invoice engines work, which engine to use.
- Payments and Billing FAQ — common payment and billing questions.
- Edit payment on booking — how to adjust payments on bookings.
- Payment options — configuring payment methods and templates.
- GoCardless Integration FAQ — setting up GoCardless and email-notification payment matching.
- Email-notification payment matching — faster alternative to GoCardless, no 90-day renewal.
- Xero Integration — connecting Zooza with Xero for invoicing.
- VAT management — configuring VAT rates and rules.
Invoices list
Go to Sales & Payments → Invoices to view all generated invoices. Use the filter bar to narrow by date range, billing period, invoice profile, or billing status. From the list you can download individual invoices, download all as a ZIP, or export the full list. Each invoice row shows the invoice number, client, amount, and status.
Zooza platform subscription billing
As of June 2025, all Zooza subscription billing is handled through the Zooza platform in partnership with Buyloop (a subscription and billing management provider).
To manage your Zooza subscription:
- Log in to your Zooza account.
- Go to Settings → Current Product → Change Subscription → Checkout.
- Choose your subscription type and enter billing and payment information.
- To pay online, register a payment card under Payment Methods.
Contact Zooza support if you need a copy of a past subscription invoice or have a billing query about your Zooza account.